什么是 RESTHeart?
什么是 RESTHeart?
1. 简介
RESTHeart 是一个基于 Java 的框架,使我们能够快速在 MongoDB 之上构建 HTTP API。它使我们能够以最少的设置将 MongoDB 集合暴露为 REST 和 GraphQL API,同时仍然允许我们根据需要控制事物。
在本教程中,我们将快速了解 RESTHeart API 框架。
2. 什么是 RESTHeart?
RESTHeart 提供了一个构建在 MongoDB 之上的开源 API 服务器。它会自动将我们的集合暴露为 REST 和 GraphQL 端点,使我们无需编写任何代码即可创建 API。
开箱即用,我们可以获得:
- 通过 HTTP 和 GraphQL 实现完整的 CRUD 支持
- 基于角色的访问控制和身份验证
- 用于用户和角色管理的内置管理 API
- 通过 Java 插件或配置实现自定义行为的扩展点
这为构建基于 HTTP 的 API 提供了一个零代码解决方案,从而实现了快速实施。在需要时,我们还可以集成自定义 Java 代码以实现开箱即用的额外功能。
3. 运行 RESTHeart
如果想在本地运行 RESTHeart,我们需要安装 Java 21 或更高版本。此外,我们还需要下载 RESTHeart 发行版。下载并解压后,我们可以通过运行 restheart.jar 立即启动服务:
$ java -jar restheart.jar
17:39:17.943 [main] INFO  org.restheart.Bootstrapper - Starting RESTHeart instance default
17:39:17.945 [main] INFO  org.restheart.Bootstrapper - Version 8.4.0
.....
17:39:19.188 [main] INFO  org.restheart.Bootstrapper - RESTHeart started
在没有配置的情况下,它将尝试使用位于 127.0.0.1:27017 且不需要凭据的 MongoDB。
或者,可以使用提供的 Docker 镜像来运行 RESTHeart。这也使我们能够运行包含 MongoDB 的 Docker Compose 设置,因此它可以作为一个单独的堆栈启动。为此,我们需要一个 docker-compose.yml 文件:
$ cat docker-compose.yml
services:
  mongodb:
    image: mongo:latest
    container_name: mongodb
    ports:
      - "27017:27017"
    networks:
      - mongo-restheart-network

  restheart:
    image: softinstigate/restheart:latest
    container_name: restheart
    ports:
      - "8080:8080"
    networks:
      - mongo-restheart-network
    environment:
      MONGO_URI: mongodb://mongodb:27017
    depends_on:
      - mongodb

networks:
  mongo-restheart-network:
    driver: bridge
然后我们可以使用 docker compose 启动服务,一切准备就绪:
$ docker compose up -d
[+] Running 3/3
   Network restheart_mongo-restheart-network  Created
   Container mongodb                          Started
   Container restheart                        Started
一切启动后,我们可以通过调用服务器上的 /ping 端点来测试设置:
$ curl localhost:8080/ping
{"message": "Greetings from RESTHeart!", "client_ip": "192.168.65.1", "host": "localhost:8080", "version": "8.4.0"}
至此,我们已经拥有了一个功能齐全的服务。
4. 身份验证和用户
对我们的 RESTHeart 服务的大多数 API 调用都需要身份验证,RESTHeart 会自动处理。例如,如果我们向根资源发出未经身份验证的请求,那么我们将收到 HTTP 401 Unauthorized 响应:
$ curl -v localhost:8080/
> GET / HTTP/1.1
>
< HTTP/1.1 401 Unauthorized
< WWW-Authenticate: Basic realm="RESTHeart Realm"
默认情况下,用户记录都在我们的 MongoDB 数据库中的 users 集合中进行管理。如果我们针对空数据库启动 RESTHeart,则会自动创建此集合,并将单个 admin 用户添加到其中:
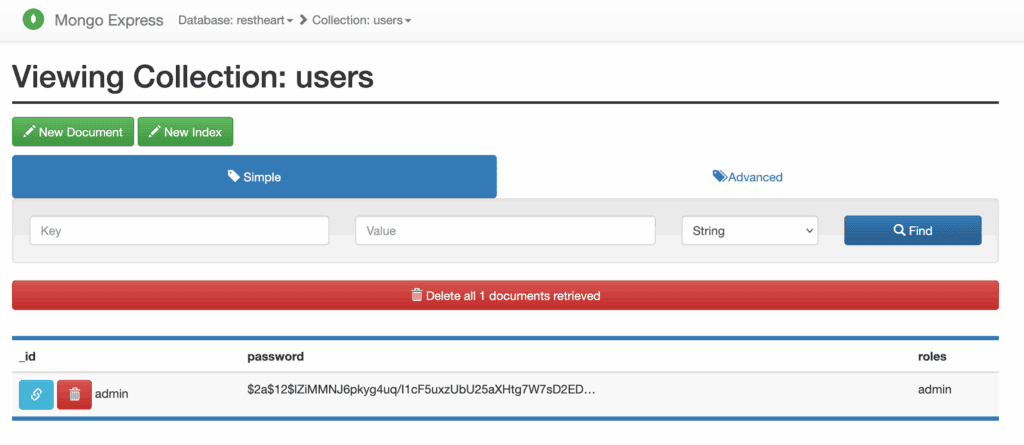
虽然密码经过安全哈希处理且无法查看,但默认凭据由用户名 admin 和密码 secret 组成。我们现在可以使用这些凭据再次发出请求:
$ curl -v -u admin:secret localhost:8080/
> GET / HTTP/1.1
> Authorization: Basic YWRtaW46c2VjcmV0
>
< HTTP/1.1 200 OK
< Content-Type: application/json
<
["acl", "users"]
现在可以正常工作,并且我们得到了预期的响应。
5. 使用 RESTHeart 进行 CRUD 操作
RESTHeart 会自动暴露我们数据库中的 MongoDB 集合,以便我们可以通过标准的 REST 和 GraphQL API 以最少的努力来读取和操作它们。
5.1. REST API
RESTHeart 为每个集合暴露了一组具有标准 URL 模式的 REST API:
* GET /<collection> – 搜索集合
* GET /<collection>/<id> – 从集合中获取记录
* POST /<collection> – 在集合中创建新记录
* PUT /<collection>/<id> – 替换集合中的记录
* PATCH /<collection>/<id>_ – 修补集合中的记录
* DELETE /<collection>/<id> – 删除集合中的记录
我们还可以通过发送特殊请求来创建新集合。为此,我们直接向集合的端点发出 PUT 请求:
$ curl -v -u admin:secret -X PUT localhost:8080/posts
> PUT /posts HTTP/1.1
>
< HTTP/1.1 200 OK
< Content-Type: application/json
< Content-Length: 0
<
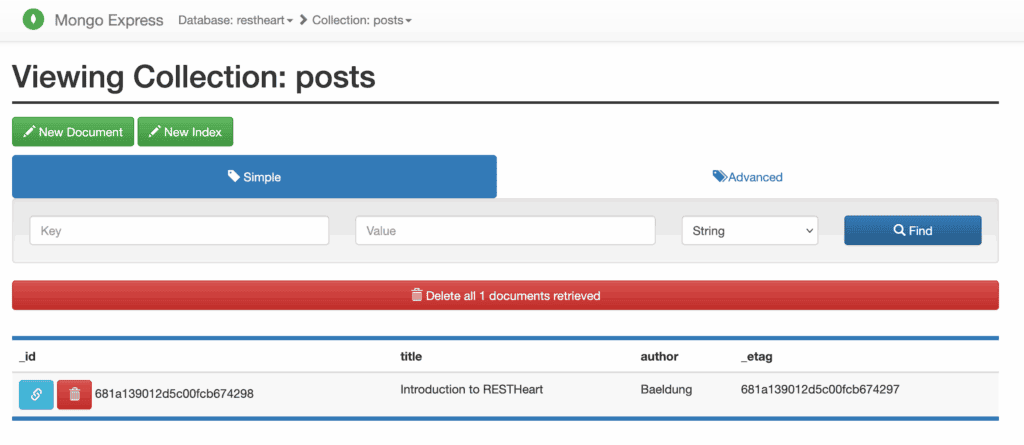
一旦我们有了集合,让我们使用 POST 请求在其中创建一条新记录:
$ curl -v -u admin:secret -X POST localhost:8080/posts -d '{"title": "Introduction to RESTHeart", "author": "Baeldung"}' -H "Content-Type: application/json"
> POST /posts HTTP/1.1
> Content-Type: application/json
> Content-Length: 60
>
< HTTP/1.1 201 Created
< Location: http://localhost:8080/posts/681a139012d5c00fcb674298Copy
这不会返回实际记录,但它确实为我们提供了一个指向它的 Location 标头。这也可以直接在数据库中看到:
然后我们可以通过指定 ID 使用 GET 请求检索此记录:
$ curl -v -u admin:secret localhost:8080/posts/681a139012d5c00fcb674298
> GET /posts/681a139012d5c00fcb674298 HTTP/1.1
>
< HTTP/1.1 200 OK
< Content-Type: application/json
< Content-Length: 152
<
{
  "_id": { "$oid": "681a139012d5c00fcb674298" },
  "title": "Introduction to RESTHeart",
  "author": "Baeldung",
  "_etag": { "$oid": "681a139012d5c00fcb674297" }
}
我们还可以通过对整个集合使用 GET 请求来选择整个集合:
$ curl -v -u admin:secret localhost:8080/posts
> GET /posts HTTP/1.1
>
< HTTP/1.1 200 OK
< Content-Type: application/json
< Content-Length: 154
<
[
  {
    "_id": { "$oid": "681a139012d5c00fcb674298" },
    "title": "Introduction to RESTHeart",
    "author": "Baeldung",
    "_etag": { "$oid": "681a139012d5c00fcb674297" }
  }
]
正如预期的那样,我们还可以使用 PUT、PATCH 和 DELETE 调用来更新和删除这些记录:
$ curl -v -u admin:secret -X PUT localhost:8080/posts/681a139012d5c00fcb674298 -H "Content-Type: application/json" -d '{"title": "Intro to RESTHeart", "author": "Baeldung"}'
> PUT /posts/681a139012d5c00fcb674298 HTTP/1.1
> Content-Type: application/json
> Content-Length: 53
>
< HTTP/1.1 200 OK
< Content-Type: application/json
< Content-Length: 0
<
这些调用都不会返回结果,但如果我们再次查询,结果会立即可用。
5.2. GraphQL API
除了 REST API,RESTHeart 还使我们能够通过 GraphQL API 暴露我们的数据。与 REST API 不同,这需要一些初始配置才能使一切按预期工作。
所有的 GraphQL API 都由 gql-apps 集合中的记录定义。所以我们首先需要创建这个集合:
$ curl -v -u admin:secret -X PUT localhost:8080/gql-apps
然后我们需要在此集合中创建一个特殊记录,其中包含我们的 GraphQL API 定义。要创建一个暴露我们一直在使用的 Posts 的 API,配置如下所示:
$ cat posts.schema
{
    "_id": "restheart-posts",
    "descriptor": {
        "name": "restheart-posts",
        "description": "RESTHeart Tutorial",
        "enabled": true,
        "uri": "restheart-posts"
    },
    "schema": "type Post { title: String author: String } type Query { posts: [Post] }",
    "mappings": {
        "Post": {
            "name": "name",
            "author": "author"
        },
        "Query": {
            "posts": {
                "db": "restheart",
                "collection": "posts"
            }
        }
    }
}
descriptor 字段提供了一些 RESTHeart 用于管理 API 的定义。这里最重要的部分是 uri 字段,我们稍后会用到它。此处的 schema 字段是我们的 API 的完整 GraphQL 模式定义,以 GraphQL 模式定义语言 编写。mappings 字段告诉 RESTHeart 如何在 GraphQL API 和 MongoDB 集合之间进行映射。在这种情况下,我们定义了一个包含 name 和 author 字段的 Post 类型,以及一个包含 posts 字段的 Query 类型,该字段映射到我们数据库中的 posts 集合。
然后我们像以前一样创建此记录:
$ curl -v -u admin:secret -X POST localhost:8080/gql-apps -d "@posts.schema" -H "Content-Type: application/json"
完成此操作后,我们的 GraphQL API 就可以使用了。我们将 uri 字段设置为 restheart-posts,这意味着我们的 API 暴露在 /graphql/restheart-posts 上:
$ curl -v -u admin:secret -X POST localhost:8080/graphql/restheart-posts -d "{ posts { title author } }" -H "Content-Type: application/graphql"
> POST /graphql/restheart-posts HTTP/1.1
> Content-Type: application/graphql
> Content-Length: 26
>
* upload completely sent off: 26 bytes
< HTTP/1.1 200 OK
< Content-Type: application/graphql-response+json
< Content-Length: 83
<
{
  "data": {
    "posts": [
      {
        "title": "Intro to RESTHeart",
        "author": "Baeldung"
      }
    ]
  }
}
我们可以立即看到这与我们的 REST API 管理的数据相同。
6. 总结
在本文中,我们简要介绍了 RESTHeart 及其功能。使用此框架可以实现更多功能,因此下次您需要创建 HTTP API 时,它非常值得一看。
感谢阅读!如果您学习过程中如遇困难?可以加入我们超高质量的技术交流群,参与交流与讨论,更好的学习与进步!