Spring Cloud Alibaba基础教程:与Dubbo的完美融合
很早以前,在刚开始搞Spring Cloud基础教程的时候,写过这样一篇文章:《微服务架构的基础框架选择:Spring Cloud还是Dubbo?》,可能不少读者也都看过。之后也就一直有关于这两个框架怎么选的问题出来,其实文中我有明确的提过,Spring Cloud与Dubbo的比较本身是不公平的,主要前者是一套较为完整的架构方案,而Dubbo只是服务治理与RPC实现方案。
由于Dubbo在国内有着非常大的用户群体,但是其周边设施与组件相对来说并不那么完善。很多开发者用户又很希望享受Spring Cloud的生态,因此也会有一些Spring Cloud与Dubbo一起使用的案例与方法出现,但是一直以来大部分Spring Cloud整合Dubbo的使用方案都比较别扭。这主要是由于Dubbod的注册中心采用了ZooKeeper,而开始时Spring Cloud体系中的注册中心并不支持ZooKeeper,所以很多方案是存在两个不同注册中心的,之后即使Spring Cloud支持了ZooKeeper,但是由于服务信息的粒度与存储也不一致。所以,长期以来,在服务治理层面上,这两者一直都没有一套完美的融合方案。
直到Spring Cloud Alibaba的出现,才得以解决这样的问题。在之前的教程中,我们已经介绍过使用Spring Cloud Alibaba中的Nacos来作为服务注册中心,并且在此之下可以如传统的Spring Cloud应用一样地使用Ribbon或Feign来实现服务消费。这篇,我们就来继续说说Spring Cloud Alibaba下额外支持的RPC方案:Dubbo。
入门案例
我们先通过一个简单的例子,来直观地感受Nacos服务注册中心之下,利用Dubbo来实现服务提供方与服务消费方。这里省略Nacos的安装与使用,如果对Nacos还不了解,可以查看本系列的使用Nacos实现服务注册与发现,下面就直接进入Dubbo的使用步骤。
构建服务接口
创建一个简单的Java项目,并在下面定义一个抽象接口,比如:
public interface HelloService {

    String hello(String name);

}
构建服务接口提供方
第一步:创建一个Spring Boot项目,在pom.xml中引入第一步中构建的API包以及Spring Cloud Alibaba对Nacos和Dubbo的依赖,比如:
    <dependencies>
        <!-- 第一步中构建的API包 -->
        <dependency>
            <groupId>com.didispace</groupId>
            <artifactId>alibaba-dubbo-api</artifactId>
            <version>0.0.1-SNAPSHOT</version>
        </dependency>
        <dependency>
            <groupId>org.springframework.boot</groupId>
            <artifactId>spring-boot-starter-actuator</artifactId>
        </dependency>
        <dependency>
            <groupId>org.springframework.boot</groupId>
            <artifactId>spring-boot-starter-web</artifactId>
        </dependency>
        <dependency>
            <!--<groupId>com.alibaba.cloud</groupId>-->
            <groupId>org.springframework.cloud</groupId>
            <artifactId>spring-cloud-starter-dubbo</artifactId>
        </dependency>
        <dependency>
            <groupId>org.springframework.cloud</groupId>
            <artifactId>spring-cloud-starter-alibaba-nacos-discovery</artifactId>
        </dependency>

        //...
    </dependencies>
这里需要注意两点:
- 必须包含
spring-boot-starter-actuator包,不然启动会报错。 spring-cloud-starter-dubbo包需要注意groupId,根据具体使用的spring cloud alibaba版本依赖来确定。- 项目孵化期间,使用的
groupId为:org.springframework.cloud; - 项目孵化之后,使用的
groupId修改为了com.alibaba.cloud,所以用户需要注意是否使用正确。避免加载不到对应JAR包的问题。
- 项目孵化期间,使用的
第二步:实现Dubbo接口
@Service
public class HelloServiceImpl implements HelloService {

    @Override
    public String hello(String name) {
        return "hello " + name;
    }

}
注意:这里的@Service注解不是Spring的,而是org.apache.dubbo.config.annotation.Service注解。
第三步:配置Dubbo服务相关的信息,比如:
spring.application.name=alibaba-dubbo-server
server.port=8001

spring.cloud.nacos.discovery.server-addr=127.0.0.1:8848

# 指定 Dubbo 服务实现类的扫描基准包
dubbo.scan.base-packages=com.didispace.alibaba.dubbo.server
dubbo.protocol.name=dubbo
dubbo.protocol.port=-1
dubbo.registry.address=spring-cloud://localhost
配置说明如下:
dubbo.scan.base-packages: 指定 Dubbo 服务实现类的扫描基准包dubbo.protocol: Dubbo 服务暴露的协议配置,其中子属性 name 为协议名称,port 为协议端口( -1 表示自增端口,从 20880 开始)dubbo.registry: Dubbo 服务注册中心配置,其中子属性 address 的值 "spring-cloud://localhost",说明挂载到 Spring Cloud 注册中心
注意:如果使用Spring Boot 2.1及更高版本时候,需要增加配置spring.main.allow-bean-definition-overriding=true
第四步:创建应用主类,比如:
@EnableDiscoveryClient
@SpringBootApplication
public class DubboServerApplication {

    public static void main(String[] args) {
        SpringApplication.run(DubboServerApplication.class, args);
    }

}
构建服务接口消费方
第一步:创建一个Spring Boot项目,在pom.xml中引入第一步中构建的API包以及Spring Cloud Alibaba对Nacos和Dubbo的依赖,具体内容与服务提供方一致:
    <dependencies>
        <!-- 第一步中构建的API包 -->
        <dependency>
            <groupId>com.didispace</groupId>
            <artifactId>alibaba-dubbo-api</artifactId>
            <version>0.0.1-SNAPSHOT</version>
        </dependency>
        <dependency>
            <groupId>org.springframework.boot</groupId>
            <artifactId>spring-boot-starter-actuator</artifactId>
        </dependency>
        <dependency>
            <groupId>org.springframework.boot</groupId>
            <artifactId>spring-boot-starter-web</artifactId>
        </dependency>
        <dependency>
            <!--<groupId>com.alibaba.cloud</groupId>-->
            <groupId>org.springframework.cloud</groupId>
            <artifactId>spring-cloud-starter-dubbo</artifactId>
        </dependency>
        <dependency>
            <groupId>org.springframework.cloud</groupId>
            <artifactId>spring-cloud-starter-alibaba-nacos-discovery</artifactId>
        </dependency>

        //...
    </dependencies>
第二步:配置Dubbo服务相关的信息,比如:
spring.application.name=alibaba-dubbo-client
server.port=8002

spring.cloud.nacos.discovery.server-addr=127.0.0.1:8848

dubbo.protocol.name=dubbo
dubbo.protocol.port=-1
dubbo.registry.address=spring-cloud://localhost
dubbo.cloud.subscribed-services=alibaba-dubbo-server
注意:
- 这里多增加了
dubbo.cloud.subscribed-services参数,表示要订阅服务的服务名,这里配置的alibaba-dubbo-server对应的就是上一节服务提供方的spring.application.name的值,也就是服务提供方的应用名。 - 如果使用Spring Boot 2.1及更高版本时候,需要增加配置
spring.main.allow-bean-definition-overriding=true。
第三步:创建应用主类,并实现一个接口,在这个接口中调用Dubbo服务,比如:
@EnableDiscoveryClient
@SpringBootApplication
public class DubboClientApplication {

    public static void main(String[] args) {
        SpringApplication.run(DubboClientApplication.class, args);
    }

    @Slf4j
    @RestController
    static class TestController {

        @Reference
        HelloService helloService;

        @GetMapping("/test")
        public String test() {
            return helloService.hello("didispace.com");
        }
    }

}
注意:这里的@Reference注解是org.apache.dubbo.config.annotation.Reference
测试验证
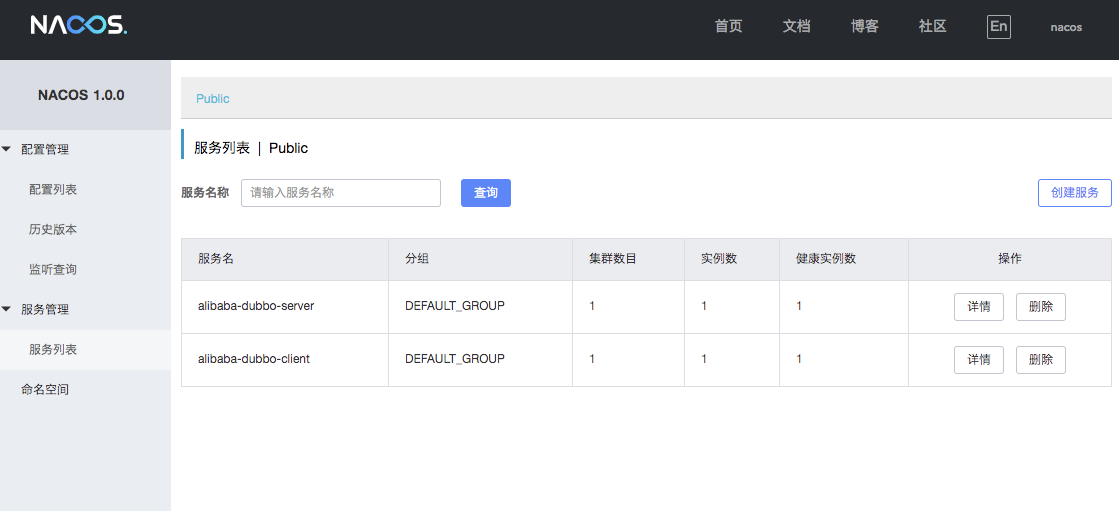
完成了上面的所有开发之后,我们可以将Nacos、服务提供者、服务消费者依次启动起来。在完成启动之后,我们可以在Nacos控制台的服务列表中看到上面定义的两个服务,比如:

接下来,我们就可以通过调用服务消费者中定义的/test接口来触发dubbo服务的消费了。如果一切顺畅,应该可以得到如下结果:
$ curl localhost:8002/test
hello didispace.com
小结
通过上面的例子,如果你曾经同时玩过Spring Cloud和Dubbo,一定会深有感触。你不用再同时顾虑Eureka和Zookeeper的配置,也不同同时关注这两个中间件的健康,只需要关注和维护好Nacos一个即可。而对于Dubbo的配置和使用来说,配置还是相当简单的,而代码编写上与以往的Dubbo没什么大的不同。在Spring Cloud Alibaba的整合之下,Dubbo用户既可以享受到原本RPC带来性能优势,又可以更好的享受Spring Cloud的各种福利;而对于Spring Cloud用户来说,在服务治理层面,又对了一个不错的可选项。可以说这块的整合是真正的让这两大用户群体得到了很好的融合,起到了互相成就的作用。
参考资料:官方文档
代码示例
本文介绍内容的客户端代码,示例读者可以通过查看下面仓库中的alibaba-dubbo-api、alibaba-dubbo-server、alibaba-dubbo-client项目:
- Github:https://github.com/dyc87112/SpringCloud-Learning/
- Gitee:https://gitee.com/didispace/SpringCloud-Learning/
如果您对这些感兴趣,欢迎star、follow、收藏、转发给予支持!
